Products
powered by electricity should be serviced or repaired only by experienced
professional technicians. Any attempt to service or repair the product or
products dealt with in this service information by anyone else could result in
serious injury or death.
Troubleshooting for Picture Trouble. How to determine the defective board.
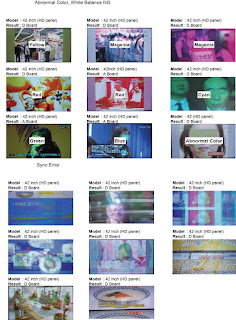
Diagnosis for Picture Problem (All Over the Screen). Abnormal
Color, Vertical Line, Sync Error, Noise Picture-All Models
Diagnosis for Picture Problem (All Over the Screen).
Enter
the “Internal Test Pattern Generator”
or
Is
the screen “White”, after disconnecting the connector “A5”?
Vertical Line Problem.
Picture Trouble at Upper or Lower half.
Picture Trouble at Right or Left half (50 Inch)
Picture Trouble at Right or Left half (42 Inch).
Picture Trouble in 50 Inch Models. No Picture, Picture noise, Half Vertical
line, etc.
Picture Trouble all Over the Screen. Picture noise, Full Vertical line, etc.
Symptoms and Remedies.
Picture Problem (All over the screen). Noise Picture, Vertical Line.
Abnormal colour and sync error.
Picture Problem (Right half or Left half).
Self-check Procedure.
CHASSIS: GPH10D: All models.
How to access the self-check screen to reset the unit.
Select
a television channel, and while pressing the [VOLUME ( - )] button on the main
unit, press the [OK] button on the remote control for more than 3 seconds.
How to Exit the self-check screen.
Press
and hold the Power button on the TV for 5 seconds or disconnect the AC cord
from the wall outlet.
TV
volume down & OK on remote only does a basic IC self check. It does NOT
Reset the TV.
It
does not clear channel programmed settings, picture settings, channel labels,
LOCK mode settings, or password.
Using
this method, it shows the unit firmware version (Peaks 1.050 and GenX 1.00) and
it checks IC communications ONLY.
This
is more useful to identify the firmware version without having to decode the
info in the setup menu About/Version screen.
To Reset the
Unit, turn the TV on and while pressing the “VOLUME ( - )” button on the main
unit, press the “Menu” button on the remote control for more than 3 seconds.
The
Self-Check menu appears on screen. Then, disconnect the AC cord from the wall
outlet.
[Note:
All customer programmed parameters will be erased.]
TH-42PX75U/ TH-42PX77U Driver Setup Adjustment.
1.
Input a white signal to plasma video input.
2.
Set the picture controls as follows.
Picture
menu: Vivid
Normal:
Set
Aspect:
Full.
Caution
1.
First perform Vsus adjustment.
2.
Confirm the voltage level of VSCN. This should be done after the adjustment of
Vad which should be - 105V
When
Vad = -105V, Vscn voltage is 40V ±4V.
Initialization Pulse Adjustment.
1.
Input a 100% White signal to the unit.
2.
Set the picture controls as follows:
Picture
menu : Vivid
Normal
: Set
Aspect
: Full
3.
Connect an Oscilloscope to test point TPSC1. Using VR6602, adjust (T2) for
195+/-10µ Sec.
TH-50PX75U - TH-50PX77U Driver Setup Adjustment.
TH-42PX75U and TH-50PX75U BOARD LAYOUT AND PART NUMBERS
TH-42PX77U and TH-50PX77U BOARD LAYOUT AND PART NUMBERS


No comments:
Post a Comment