K-LED32HDST2/MS08GP-LA/Smart TV/CSFGTA
Alignment Procedure-MS08GP Series-L32D2700/L40D2700
MS08GP These chassis are designed for Eastern Europe markets Ready
for IPTV. The main chip is from Mstar and supports below features matrix:
Factory Menu: Methods of Entering
Method 1: Using the remote control
Select
“Picture” and press “OK” key to enter into Picture Mode
press RIGHT” or “LEFT” key Select User Mode
Press the subsequence RCU keys “9”, “7”, “3” and “5”, will appear in
the left top of screen In case of “Factory
hotKey” is enabled( On) , just press RCU “Return”
key to pop-up again the Factory menu.
The status of “Factory Key” can
be changed in Factory Menu->Hotkey.
Press RCU “OK” key or “RIGHT” key to enter the submenu.
Press RCU “Menu” key to go back
to the root menu.
Press RCU “RIGHT” or “LEFT” key to change the values.
Press RCU “OK” key run the
function.
Press RCU “Exit” key exit the Factory menu.
Design Menu
Methods of Entering:
Method 1: Using the remote, enter the “Picture” submenu in the OSD; choosing the
“contrast” item and press the 1,9,5,and 0 in series ,Design Menu will appear in
the left top of screen.
Method 2: Press RETURN button when DESIGN HOTKEY is enabled (ON).
Hotel menu
Service Menu
1.Methods of Entering
Using the remote, enter the “Picture” submenu in the OSD; choosing the “contrast”
item and press the 9,7,0 and 5 in series, Service Menu will appear in the left
top of screen.
Debugging
5.1. General Steps of debugging
According to the requirement of the order, below steps are needed for appropriate
setting.
1) Enter the Factory Menu, enable FAC HOTKEY.
2) Check Project ID and the version of software, release date displayed at the
bottom of Factory Menu.
3) Enter Design Menu, choose SERVICE MENUèProject ID, choose corresponding Project ID number of the product
(Refer to the “V6-PROJECT -ID0**”in the BOM list).
4) Return to Factory Menu, check the Product model.
5) Choose Factory Menu->NVM RESET and press the right button of the remote
and wait until prompt OK appears.
6) Restart the set
7) According to the requirement of the order, Set the items of SHOP INIT and
Hotel Menu etc.
8) After aging under normal temperature, calibrate ADC and adjust
white balance.
9) Choose Factory Menu ->SHOP and press the button of remote to
initialize the set.
Note: After step 9, Hotel Menu will be disabled by default. Therefore, if the
order requires hotel function, it is necessary to enable hotel function by set
Design MENU->Service Menu->HOTEL ENABLE to ON.
Equipment
·Color Analyzer CA-210.
·Video Pattern Generator Chroma2329.
·Color TV Pattern Generator PM5418/Fluke5418.
·VGA cable , AV(RCA) cable , HDMI cable etc.


|
5.3. ADC Function |
not Calibration |
|
|||||
|
5.4. White Balance adjustments
(Manual) |
|
||||||
|
Before adjustment ,you must make
sure the ADC status(only PC and YPbPr) |
|
||||||
|
is |
“success”and |
Color |
Analyzer |
has |
been |
calibrated |
.Only |
AV1,YPbPr,PC,HDMI1
need to be adjusted. HDMI1 should be the first.
Signal and generator
The pattern of the signal should be used are White (Chroma2329 pattern 113) and
Grey (pattern 114).
The format of signal are respectively 720P for HDMI1 (Chroma2329 Timing 69),PAL
(Chroma2329 Timing38) for AV1,1024X768@60Hz(Chroma2329 Timing14) for VGA 。
Steps of adjustment
1).Enter the factory menu-> White Balance, select source HDMI 1 and Normal
Temperature.
2).Input grey signal in 720p format.
3).Change R-OFFSET and B-OFFSET to make sure the value of color coordination
equal to (X=0.270 +/-0.015;Y=0.290 +/-0.015).
4).Input white signal in 720p format.
5).Change R-GAIN and B-GAIN to make sure the value of color coordination equal
to (X=0.270 +/-0.015;Y=0.290 +/-0.015).
6).Repeat step 2—5 until both of
the value of color coordination of white and grey equal to (X=0.270
+/-0.015;Y=0.290 +/-0.015).
For COOL and WARM color temperature, just repeat step 2—5.The color coordination
we recommend for COOL and WARM color temperature is respectively(X=0.270
+/-0.015;Y=0.270 +/-0.015) and (X=0.300 +/-0.015;Y=0.305 +/-0.015).
After the adjustment of HDMI1, you can switch to other source AV, PC and YPbPr
and repeat step 1—6 to do the WB adjustment.
Note: For some small size LED panel,the color coordination of specifications is
not X=0.270/Y=0.290,and we recommend you adopt the values from panel
specifications.
ADC Calibration and White Balance
Adjustment (automatic)
The process of adjusting White Balance automatically is out of the range of
this file, Please refer to the relevant technical file of HuiZhou factory of
TCL.
6.Chip list of software programming before SMT
Following chips must be programmed before SMT by tools
|
Position |
Chip type |
Software description |
|
U301 |
MT29F2G08ABAEA |
HDMI HDCP Key, System Software
etc. |
Software update: Method of SW update:
1.Download the bin file to the root directory of your USB device (Do not change
the file name); Then insert the USB device to USB interface of TV set.
MS08GPSeries with its upgrade file corresponding relation as the table below
show:
|
Chassis Name |
Sales |
Upgrade filename |
Remark |
|
MS08GP |
LA |
MS08GP_MAIN.bin |
DVB-T2 |
How to upgrade FLASH SW using USB
Copy the SW BIN image “MS08GP_MBOOT.bin” into USB
stick root path.
Note: If there’s already other “MS08GP_MBOOT.bin”
into USB root, it needs to be deleted or renamed.
Plug USB stick to the TV
USB slot.
Press RCU MENUèOptionèSoftware
upgradeèBy
USBèConfirm.
Or,
turn off the TV press and hold the power key of key board before reconnect AC cord
to restart TV for 5-8seconds (Forced Upgrade).
When the "UPGRADING SOFTWARE" picture appears as below, it means TV
is uploading SW BIN image. Waiting a few minutes.
When updating is
successful, TV should restart automatically.
There are two methods to upgrade SW using USB, the first one like below In the previous of upgrade SW using USB, should program mboot bin
file”
MS08GP_MBOOT.bin” by ISP_Tool or by USB. .
Then switch off TV by removing AC cord.
Copy the SW BIN image “MS08GP_MAIN.bin” for MS08GP into USB stick
(pen
drive) root path
Note: If there’s already other “The
same name ” into USB root, it
needs to be deleted or renamed
Plug USB stick to the TV
Press and hold the power key of key board before reconnect AC cord to restart TV
for 5-8seconds.
Once USB stick starts blinking, TV is uploading SW BIN image.
When update is successful, TV should restart automatically.
Remember to perform “Factory menuÆNVM reset“ and then press RCU “OK” key
Switch off TV by removing AC cord
Reconnect AC cord to restart TV and wait few seconds for Eeprom update.
The second method:
To
use this method, there should be SW in mainboard to ensure TV can display normally.
Copy the SW BIN image “MS08GP_MAIN.bin” and into USB stick (pen
drive) root path
Press RCU MENUèOptionèSoftware
upgradeèBy
USèConfirm
TV
display warning information, that means it is upgrading, almost 3minutes later,
when upgrade successful, TV should restart automatically.
“How to change Project ID with Remote Control Unit (RCU)
Process following
subsequence IR codes to change project ID:
062598+MENU+xxx
(xxx:
Project ID, ex: 001)
Restart TV
How to upgrade MAC Address
Upgrading MAC address need
to use the tool in factory and through serial command, the specific methods
according to the operation of the factory guidance.
Instructions of Updating SW”
1. The following IC should be pre-copied before SMT process
|
Position |
PART TYPE |
Part Number |
SW |
|
U301 |
IC-TSOP48 |
13-FS29F2-G0B |
Mboot, Main Software |
2.The MAC Address, HDCP KEY, Device ID must be
upgrade by debug port into U301.
Project ID selecting
1)Press the Menu button of remote control, then select Contrast item of Picture
submenu; press 1,9,5,0 consecutively, there you go the Design Menu.
2) Select the SERVICE MENU item, press OK and RIGHT button of the remote to
enter submenu,
3)Select the PROJECT ID item, press OK or RIGHT button of the remote to enter
the submenu;
4)Press the right or left button of the remote to select the ID you want;
5)After ID selection, press MENU button of the remote to exit DESIGN MENU.
6)Finally, do AC power on/off.
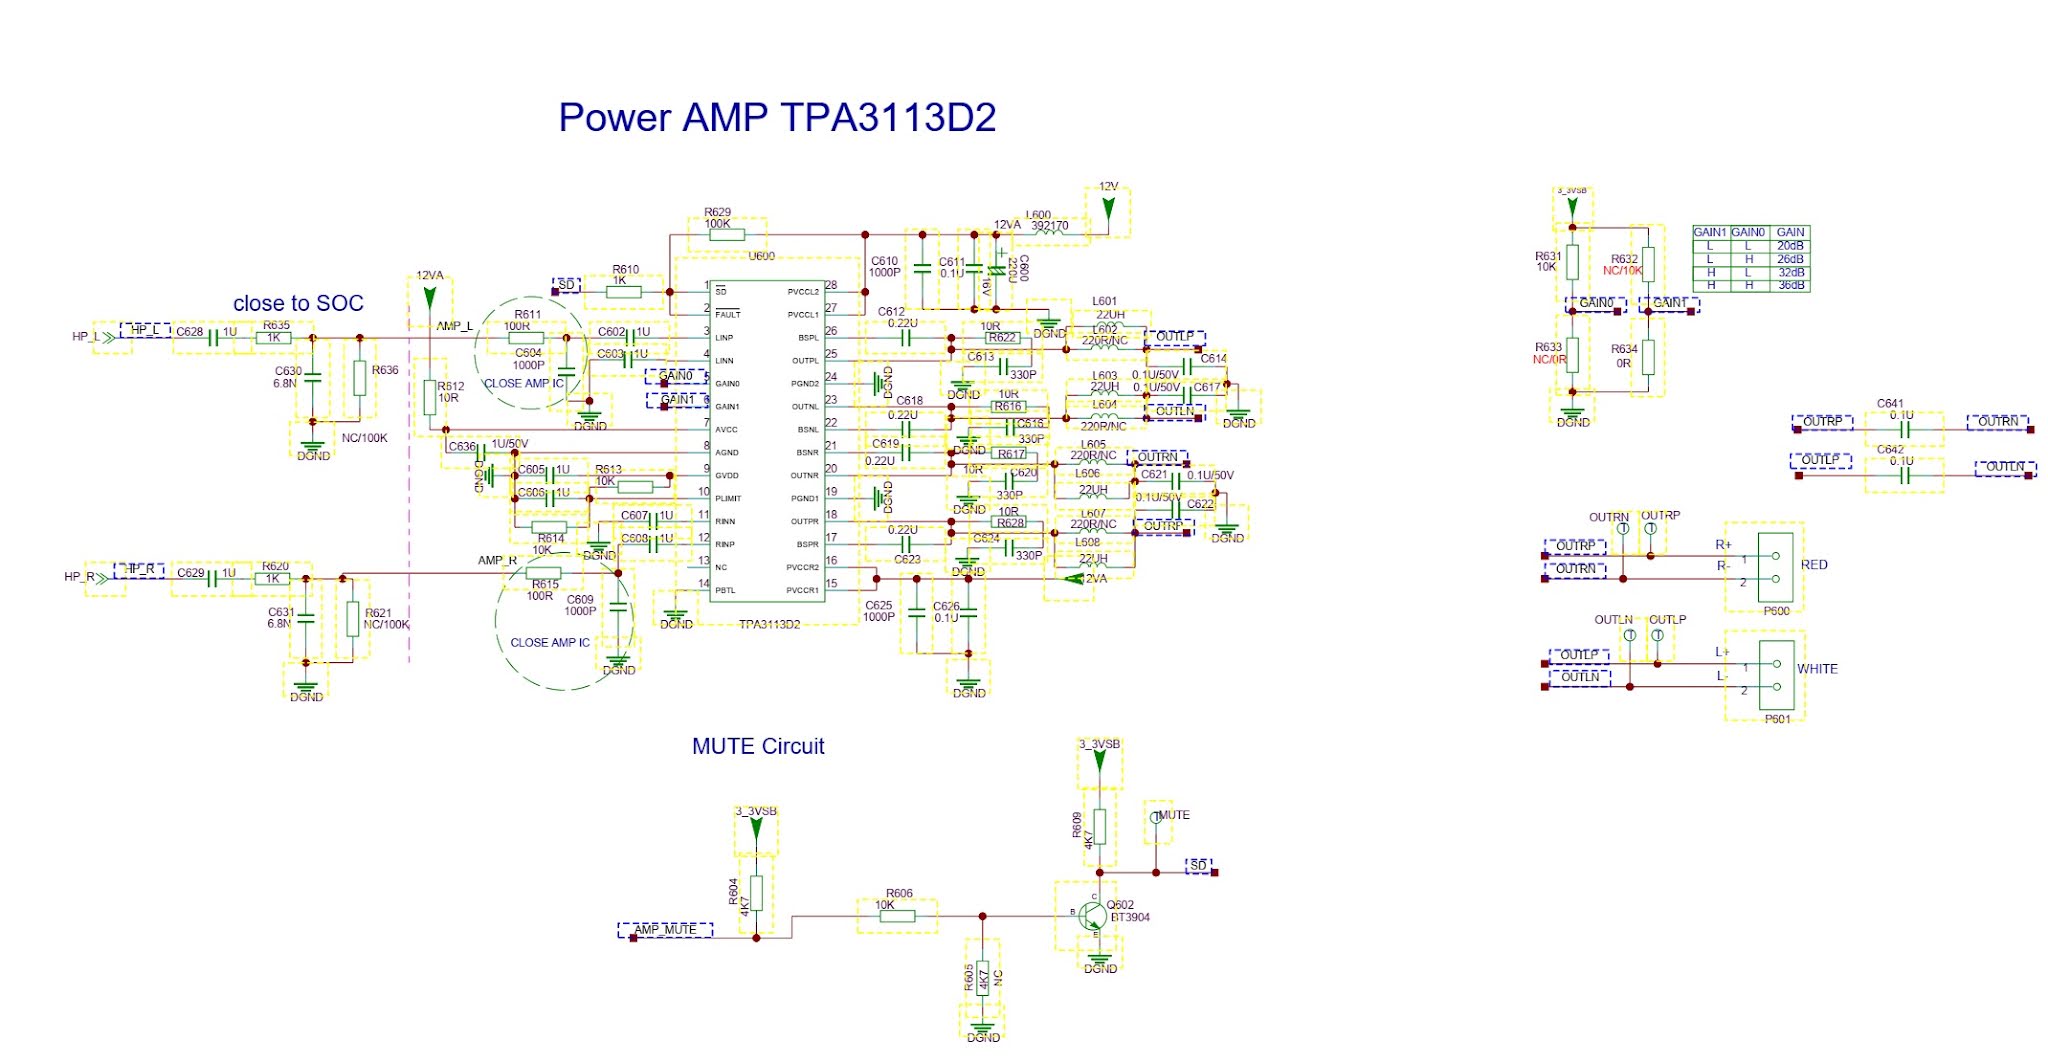
Schematic diagrams
Power supply (SMPS) schematic

Power distribution circuit

Power amplifier schematic– TPA3113D2