FACTORY MODEL: 26LC2R-TJ / 32LC2R-TJ - CHASSIS : LP61C
All of the26 - 32" LCD TV, LP61A/C, LN61A chassis (HURRICANE 3 MIDDLE) by manufacturing LG TV Plant all over the world.
Because this is not a hot chassis, it is not necessary to use an isolation transformer. However, the use of isolation transformer will help protect test instrument.
Adjustment must be done in the correct order.
The adjustment must be performed in the circumstance of 25±5°C of temperature
and 65±10% of relative humidity if there is no specific designation.
The input voltage of the receiver must keep 100~220V, 50/60Hz.
Before adjustment, execute Heat-Run for 30 minutes at RF no signal.
Adjustment items
3.1 PCB assembly adjustment items
•
Download the VCTP main software (IC601,VCPT)
• Channel memory (IC603,EEPROM)
• Colorcarrier Adjustment
3.2 SET assembly adjustment items
• DDC Data input.
• Adjustment of White Balance.
• Factoring Option Data input.
4. PCB assembly adjustment
4.1 PCB assembly adjustment method
(Using VCTP Download program)
4.1.1.Download program installation
(1) Extract a Zip file.
(2) Visual I2C & LPT Driver Installation.
Install the LPT Driver
Install the Visual I2C

LPT Port Driver (LptDrv) Setups : Program Files > Micronas
>Visual I2C > Port_Driver
*Use for Windows 95/98 : Setup_LptDrv_v0104_9x.exe
*Use for Windows 2000/XP : Setup_LptDrv_v0202_XP_2000.exe
*Use for Windows NT : Setup_LptDrv_v0104_NT.exe
(3) Verification (Start > Programs > Micronas > Visual I2C or LptDrv)
(4) LPT delay setting (File > Preference > LPT preferences)
(5) Exchange the bootloader.bat file.
Double click the Box area.

=> Select the "Bootloader.bat" file(install
>VCTP_download > Bootloader) => Push "OK"
=> Finish the program, after saving the file "download_cs.vi2c"
(if you click , the massage appears automatically)

Software program download
• Preliminary steps
4.1.2.1 Download method 1 (PCB Ass’y)
Connect the download jig to D-sub jack
(2) Execute ‘Download.vi2c’ program in PC, then a main window will be opened.

(3) Double click the blue box and confirm "Bootloader Version"
as 40.
(4) Click the "Erase Flash" button.
(5) Double click the download file low, then "edit" window
will be opened,
(6) Click the choice button in the "edit window", then "file
choice window" will be opened.
(7) Choose the Hex file in folder and execute downloading with
click " open" button.

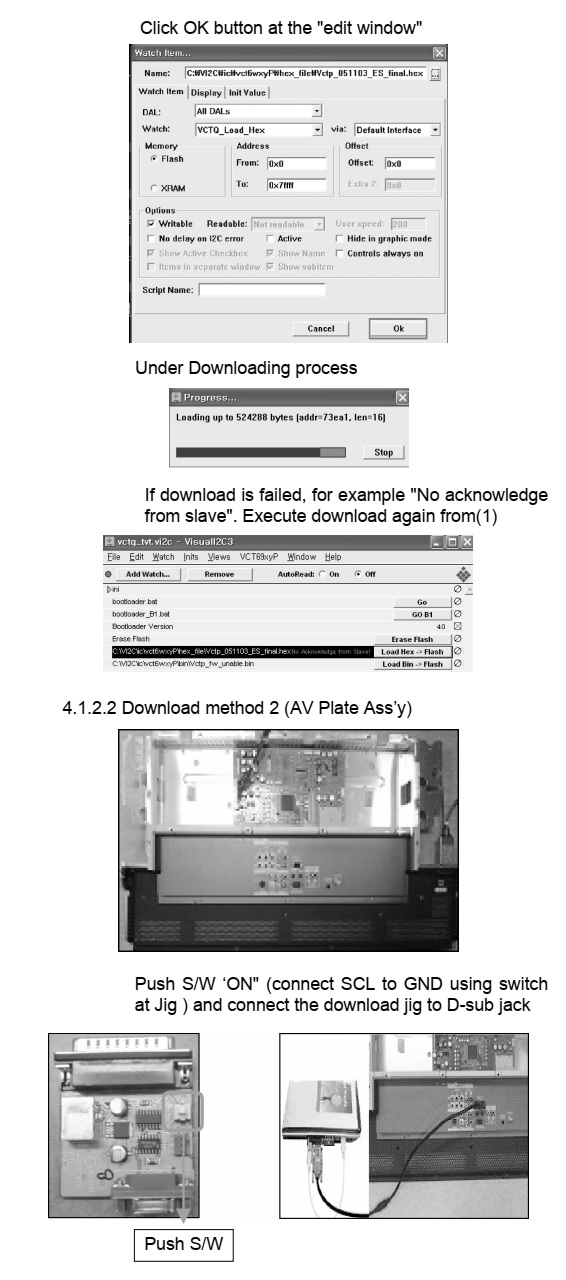
(8) Click OK button at the "edit window"
(9) Under downloading process.
(10) If download is failed, for example "No acknowledge from
slave". Execute download again from (1)
4.1.2.2 Download method 2 (AV Plate Ass’y)
(1) Push S/W ‘ON" (connect SCL to GND using switch at Jig )
and connect the download jig to D-sub jack.
(2) Supply the power (Stand-by 5V) and wait for 3 seconds.
(3) Push the S/W off (Disconnect SCL to GND using switch at jig)
(4) Execute ‘Download.vi2c’ program in PC, then a main widow will
be opened.
(5) Double click the blue box and confirm "Bootloader Version"
as 40.

(6) Click the "Erase Flash" button.
(7) Double click the download file low then, "edit" window
will be opened.
(8) Chick the choice button I n the "edit window", then "file
choice window’ will be opened.
(9) Choose the Hex file in folder and execute downloading with
click "open button"

(10) Click OK button at the "edit window"
(11) Under downloading progress.
(12) If download is failed, for example "No acknowledge from
slave", execute download again from (1)
4.1.2.2 Download method 3 (SET)
(1) Push the "Tilt" button in an Adjust Remocon Then the LCD TV will
change a "slave mode"
(2) Connect Zig to TV using a D-sub cable.

(3) Execute ‘Download_CS.vi2c’ program in PC, then a main widow
will be opened.
(4) Click "GO" button.
If you don’t push the "go” the Hex file would not be downloaded
although the download proceeds normally at first glance.
(5) Double click the blue box and confirm "Bootloader Version"
as 40.
(6) Click the "Erase Flash" button.
(7) Double click the download file low then, "edit" window
will be opened.

(8) Chick the choice button I n the "edit window", then "file
choice window’ will be opened.
(9) Choose the Hex file in folder and execute downloading with
click "open button"
(10) Click OK button at the "edit window"
(11) Under downloading progress.
(12) If download is failed, for example "No acknowledge from
slave", execute download again from (1)

4.1.2. S/W program download
(1) Connect the download jig to D-sub jack
(2) Execute ‘Channal.vi2c’ program in PC, then a main widow will be opened.
(3) Push the button change and select the Channel memory data.
(4) Check the communication is OK or not.
=> Push the Read area (Ackn. Check) and check Cyan area is OK message.
(5) Push the Update NVM from File.

4.1.3. Color carrier Adjustment (inspection process)
a. Tuning the RF signal
ZJ, TJ, CJ : PAL Philips Pattern (with Color Bar)
MJ : NTSC Digital Pattern (with Color Bar)
b. push the "adj" key in the adjustment remocon.
Adjust remote control [Service remote control]

4.2 SET assembly adjustment method
*Caution : Each
PCB assembly must be checked by check JIG set.(Because power PCB Assembly
damages to LCD Module, especially be careful)
4.2.1 EDID(The Extended Display Identification Data ) / DDC(Display Data
Channel) download
(1) Extract a Zip file
* Caution
- Use the proper signal cable for EDID Download
* Caution: - Never connect HDMI & D-SUB Cable at the same time.
- Use the proper cables below for EDID Writing.
EDID data

e.Checksum: Changeable by total EDID data
4.3 Adjustment of White Balance
* In case of White Balance rework, you have to RESET the previous White Balance
data.
(You can do that by pushing the "IN-START" key in adjust remocon and
reset)
4.3.1
Required Equipment
• Remote controller for adjustment
• Color Analyzer (CA-110 or CA-210 or same product; ch : 9)
• Auto W/B adjustment instrument (only for Auto adjustment)
• AV Pattern Generator
ZJ, TJ, CJ – model : 202 (PAL-BDGHI), pattern:78 (216 Gray)
MJ – model : 207 (NTSC-J), pattern : 78 (216 Gray)
4.3.2 Connecting diagram of equipment for measuring (For Automatic
Adjustment)
[Push the "POWER ON" key at the Adjust Remocon before Adjustment
of W/B, the Baud rate & PSM, CSM will change 115200bps, Standard (MJ:
Optimum), Normal]
4.3.3 Adjustment of White Balance for Manual adjustment
• Operate the zero-calibration of the CA-110 or CA-210, then stick sensor to
LCD module when you adjust.
• For manual adjustment, it is also possible by the following sequence
1) Select RF no signal by pressing "POWER ON" key on remote control
for adjustment then operate heat run more than 15 minutes.
2) As below Fig. 7, Supply 216Level (85 IRE) Gray pattern to Video input.
26/32LC2R-ZJ : AV3 or AV4(Input 50Hz)
26/32LC2R-TJ : AV1or AV2(Input 50Hz),
26/32/37LC2R-CJ : AV1 or AV2 (Input 50Hz)
26,32LC2R-MJ : VIDEO1 or VIDEO2 (Input 60Hz)
3) Press the POWER ON KEY on R/C for converting input mode.
4) Enter the White Balance adjustment mode by pressing the IN-START key (White Balance) on
R/C.
5) Stick sensor to center of the screen and select each items (Red/Green/Blue
Gain and Offset) using / (CH +/-) key on R/C..
6) Adjust Only High Light with R Gain / B Gain using / (VOL + / -) key on R/C.
7) Adjust it until color coordination becomes as below.
(Initially, R/G/B gain and R/G/B offset values are fixed as below)
Red Gain : 80 , Green Gain : 80 , Blue Gain : 80
Red Offset : 80, Green Offset : 80 , Blue Offset : 80
* Target Value [PSM: Standard(ZJ, TJ, CJ), Optimum(MJ),CSM: Normal]
-Normal (9300K) x ; 0.283±0.003 y ; 0.298±0.003
=> Reference Value(Automatically fixed)
-Cool(11000K): x:0.274±0.003, y: 0.286±0.003
-Warm(7200K) : x:0.303±0.003, y: 0.319±0.003
8) When adjustment is completed, Exit adjustment mode using EXIT
key on R/C.
