Sony
KDL-32EX40B, KDL-40EX40B Chassis AZ1-BD-LCD Digital Color TV – LED
blinking codes, software update, white balance adjustments, adjustments after
panel replacement and more
Self diagnosis function
The units in this manual contain a self-diagnostic function. If an error occurs, the STANDBY LED will automatically begin to flash. The number of times the LED flashes translates to a probable source of the problem. A definition of the STANDBY LED flash indicators is listed in the instruction manual for the user’s knowledge and reference. If an error symptom cannot be reproduced, the remote commander can be used to review the failure occurrence data stored in memory to reveal past problems and how often these problems occur. When an error occurs, the STANDBY LED will flash a set number of times to indicate the possible cause of the problem. If there is more than one error, the LED will identify the first of the problem areas.
The units in this manual contain a self-diagnostic function. If an error occurs, the STANDBY LED will automatically begin to flash. The number of times the LED flashes translates to a probable source of the problem. A definition of the STANDBY LED flash indicators is listed in the instruction manual for the user’s knowledge and reference. If an error symptom cannot be reproduced, the remote commander can be used to review the failure occurrence data stored in memory to reveal past problems and how often these problems occur. When an error occurs, the STANDBY LED will flash a set number of times to indicate the possible cause of the problem. If there is more than one error, the LED will identify the first of the problem areas.
Result for all of the following diagnostic items are displayed on screen.
[If the screen displays a “0”, no error has occurred]
[If the screen displays a “0”, no error has occurred]

Standby led flash count

Self check diagnostic list
For errors with symptoms such as “power sometimes shuts off” or “screen sometimes goes out” that cannot be confirmed, it is possible to bring up past occurrences of a failure for confirmation on the Self Check diagnostic screen:
TV must be in standby mode. (Power off).
Press the following buttons on the Remote Commander within a second of each other [Service Mode]

Clearing the self check diagnostic list
Since the diagnostic results displayed on the screen are not automatically cleared, always check the self-diagnostic screen after you have completed the repairs to be sure you have cleared the result display to “0”.
To clear the Error history and Error count: Press the Channel 8 Channel 0.
To clear the Panel operation time: Press the Channel 7 Channel 0 .
To exit the Self Diagnostic screen, turn off the power to the TV by pressing the POWER button on the remote or the POWER button on the TV.
Accessing service adjustment mode
TV must be in Standby Mode. (POWER off).
Press the following buttons on the Remote Commander within a second of each other:
DISPLAY Channel 5 Volume + POWER.
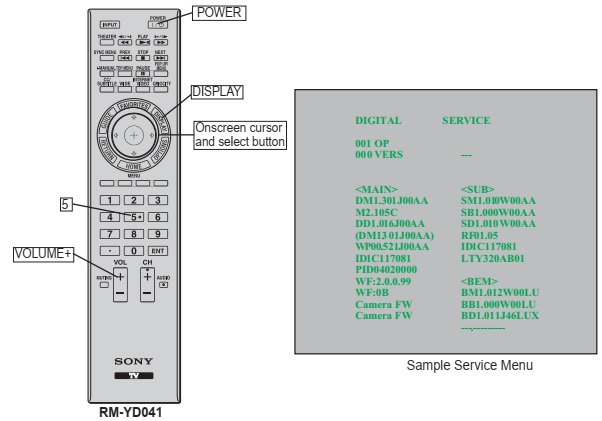
Viewing the service menus
Use the Remote Commander to view the Digital, Chassis and Sub
Service Menus and their options.
To display the Service Menu that contains the Category you want to adjust, press JUMP or OPTIONS on the Remote Commander.
Use the Remote Commander to view the Digital, Chassis and Sub
Service Menus and their options.
To display the Service Menu that contains the Category you want to adjust, press JUMP or OPTIONS on the Remote Commander.

Using the remote commander to view or change service data
Use the buttons on the Remote Commander to access the Service
Menu items and adjust the Data Values.
DISPLAY Channel 5 Volume + POWER
To change the Category, press 2. 5 to move the next category. Or press to go back to the Previous Category.
Note: Pressing 2 or 5 only changes the Categories within the Service Menu displayed.
To change the adjustment item,
press 1 to move to the Next Item or 4 to go back to the Previous Item
To change the Data Value,
press 3 to increase the Data Value or 6 to decrease the Data Value.
Press MUTING then press 0 to write the changes.
To exit service mode, press HOME or turn the TV power off.
Adjustments after replacing the BAL board or LCD panel
The following procedures must be completed after replacing the BAL Board or the LCD panel.
Update the TV to the latest software version
Select the Model
Select the Destination
Verify model and panel information are correct
Reconnect all cables.
Updating the software
After replacing the BAL Board or the LCD Panel, you must update the software to the latest version.
[Disconnect all cables (RF, External input, Ethernet, etc.) from the TV]
Instructions for updating the software are included with the software package. After completing the software update, proceed to “Selecting the Model”
TV must be in standby mode. (Power off).
Access Service Mode.
Press the following buttons on the Remote Commander within a second of each other:
DISPLAY Channel 5 Volume + POWER
Display the DIGITAL Service Menu.
NOTE: There are 3 Service Menus for this model, DIGITAL, CHASSIS, and SUB. If the DIGITAL Service Menu is not displayed, press JUMP or OPTIONS on the Remote Commander.
Press 2 to move to the 002 MODEL (Next) category.
Using the table, press 3 to increase the data value or 6 to decrease the data value, to match the model of the TV
After replacing the BAL Board or LCD Panel, go into Service Mode to set the Model data value.
Proceed
to “Selecting the Destination

Setting the destination
CAUTION: Selecting the incorrect destination may requiring replacing the BAL Board.
Press 1 to move to “001 DEST” sub Category.
Using the table, press 3 to increase thye data value or 6 to decrease the data value, to select the destination of the TV
CAUTION: Verify the DESTINATION is set correctly before proceeding to the next step. If another destination Data Value is selected, it may possibly corrupt the software which would require a BAL Board replacement.
After verifying the destination data value displays, press 0 to save (Write) the changes.
Exit Service Mode by pressing HOME or turn the TV power off.
Proceed to “Verifying the Model and Panel Information”.

Verifying the model and panel information
After saving the changes to the service data, verify the information.
TV must be in standby mode. (Power off).
Access Service Mode.
Press the following buttons on the Remote Commander within a second of each other:
DISPLAY Channel 5 Volume + POWER
Display the DIGITAL Service Menu.
NOTE: There are 3 Service Menus for this model, DIGITAL, CHASSIS, and SUB. If the DIGITAL Service Menu is not displayed, press JUMP or OPTIONS on the Remote Commander.
Using the table, verify the Model ID and the Product ID match the information in the Service Menu.
Exit Service Mode by pressing HOME or turn the TV power off.
Proceed to “Reconnecting All Cables”

After completing the changes to service mode, reconnect all the
cables (RF, External input, Ethernet, etc.) to the TV then verify the TV set
picture.
If necessary, proceed to “White Balance Adjustments”.
If necessary, proceed to “White Balance Adjustments”.
Viewing
the Blu-ray service mode menu
The Blu-Ray Service Mode Menu provides information about the Blu-ray player.
TV must be in Standby Mode. (POWER off).
Press the following buttons on the Remote Commander within a second of each other:
DISPLAY Channel 5 Volume + POWER
NOTE: If the Digital Service Menu is not displayed, press Jump or Options
Press 2 to move to 007BD category,
To view the Blu-ray service adjustment mode, press 0 or ENT.

[It may take a moment for
the Blu-ray Service Mode Menu to display.]
To select a Service Mode Menu option, do one of the following:
Press the or until the item is highlighted, then press OK or Press the corresponding number on the remote.
To exit out of the service menu option, press RETURN
Exit Service Mode by pressing HOME or turn the TV power off.
[White Balance adjustment data is located on the Digital Service Menu]
TV must be in Standby Mode. (POWER off).
Press the following buttons on the Remote Commander within a second of each other:
DISPLAY Channel 5 Volume + POWER
NOTE: If the Digital Service Menu is not displayed, press Jump or Options
Press 2 to move to 006WB category
Press 0 to enter white balance adjustment mode.
White balance adjustment
To select the White Balance Adjustment setting that needs to be changed, do the following:
To select R_DRV, press 1
b. To select G_DRV, press 2.
c. To select B_DRV, press 3
d. To select R_BKG, press 4.
e To select G_BKG, press 5.
f. To select B_BKG, press 6.
After selecting the White Balance setting, press ENT to display the edit screen.
The screen displays a “Please input WB items” message.
Using the numbers buttons on the remote, enter the Data Value for the White Balance setting (value must be between 1 and 255)
Press ENT to WRITE (save) the changes.
To exit White Balance Adjustment, press Jump or Options.
Resetting the TV to factory condition
While holding down the UP on the Remote Commander, press the POWER button on the TV Switch Unit of the set.
The set restarts and displays the Initial Setup screen. This may take several minutes.
Resetting the TV to factory condition using service mode
TV must be in Standby Mode. (POWER off).
2. Press the following buttons on the Remote Commander within a second of each other.
DISPLAY Channel 5 Volume + POWER
If necessary, press Jump or Options to go to DIGITAL mode.
Press 8.
“SERVICE” changes to green RST
Press MUTING
RST executes the command and displays EXE.
Press 0
EXE-RST displays green, and then red indicating the TV is writing the data.
When the process is complete the green SERVICE text displays and the LED display as shown below:
Cycle AC Power (Unplug and Plug AC Cord from the AC Outlet)
The set restarts and displays the Initial Setup screen.
This may take several minutes.

