Monday, 20 September 2021

Toshiba 32A36C-service mode- full schematic diagram and waveforms


After turning the power off there might still be a potential voltage that is very dangerous. When removing the Anode Cap, make sure to discharge the Anode Cap's potential voltage.
Do not use pliers to loosen or tighten the Anode Cap terminal, this may cause the spring to be damaged.

Removal procedure of anode cap

Connect one end of an Alligator Clip to the metal part of a flat-blade screwdriver and the other end to ground.
While holding the plastic part of the insulated Screwdriver, touch the support of the Anode with the tip of the Screwdriver.
A cracking noise will be heard as the voltage is discharged.


SERVICE MODE – How to enter

This unit provided with the following SERVICE MODES so you can repair, examine and adjust easily.
To enter the Service Mode, press both set key and remote control key for more than 1 second.

CONFIRMATION OF HOURS USED
POWER ON total hours can be checked on the screen. Total hours are displayed in 16 system of notation.
NOTE: If you set a factory initialization, the total hours is reset to "0".

Set the VOLUME to minimum.
Press both VOL. DOWN button on the set and Channel button (6) on the remote control for more than 1 second.
After the confirmation of using hours, turn off the power.


WHEN REPLACING EEPROM (MEMORY) IC

If a service repair is undertaken where it has been required to change the MEMORY IC, the following steps should be taken to ensure correct data settings while making reference to TABLE

Enter DATA SET mode by setting VOLUME to minimum.
Press both VOL. DOWN button on the set and Channel button (6) on the remote control for more than 1 second.
ADDRESS and DATA should appear as FIG 1

ADDRESS is now selected and should "blink". Using the VOL. UP/DOWN button on the remote, step through the ADDRESS until required ADDRESS to be changed is reached.
Press ENTER to select DATA. When DATA is selected, it will "blink".
Again, step through the DATA using VOL. UP/DOWN button until required DATA value has been selected.
Pressing ENTER will take you back to ADDRESS for further selection if necessary.
Repeat steps 3 to 6 until all data has been checked.
When satisfied correct DATA has been entered, turn POWER off (return to STANDBY MODE) to finish DATA input.
After the data input, set to the initializing of shipping.
Turn POWER on.

Press both VOL. DOWN button on the set and Channel button (1) on the remote control for more than 1 second.
After the finishing of the initializing of shipping, the unit will turn off automatically.

The unit will now have the correct DATA for the new MEMORY IC.


Schematic diagram and printed circuit board


Microcontroller schematic diagram


Chroma section schematic

Deflection section schematic

Power [SMPS] schematic

Sound section schematic

Tuner section schematic

Audio-Video schematic

CRT socket section schematic

Comb filter schematic

AV jack schematic

Waveforms


Saturday, 18 September 2021

Wednesday, 25 August 2021

KALLEY K-LEDHDST2 LED TV – Service mode, factory mode, software update, power and amplifier schematic


K-LED32HDST2/MS08GP-LA/Smart TV/CSFGTA

Alignment Procedure-MS08GP Series-L32D2700/L40D2700

MS08GP These chassis are designed for Eastern Europe markets Ready for IPTV. The main chip is from Mstar and supports below features matrix:
Factory Menu:  Methods of Entering
Method 1: Using the remote control
Select “Picture” and press “OK” key to enter into Picture Mode press RIGHT” or “LEFT” key Select User Mode
Press the subsequence RCU keys “
9”, “7”, “3 and 5 will appear in the left top of screen In case of “Factory hotKey” is enabled On , just press RCU “Return” key to pop-up again the Factory menu.
The status of “Factory Key” can be changed in Factory Menu->Hotkey.
Press RCU “OK” key or “RIGHT” key to enter the submenu.
Press RCU “Menu” key to go back to the root menu.
Press RCU “RIGHT” or “LEFT” key to change the values.
Press RCU “OK” key run the function.
Press RCU “Exit” key exit the Factory menu.

Design Menu

Methods of Entering
Method 1: Using the remote, enter the “Picture” submenu in the OSD; choosing the “contrast” item and press the 1,9,5,and 0 in series ,Design Menu will appear in the left top of screen.
Method 2: Press RETURN button when DESIGN HOTKEY is enabled (ON).

Hotel menu

Service Menu
1.Methods of Entering
Using the remote, enter the “Picture” submenu in the OSD; choosing the “contrast” item and press the 9,7,0 and 5 in series, Service Menu will appear in the left top of screen.

Debugging
5.1. General Steps of debugging
According to the requirement of the order, below steps are needed for appropriate setting.
1) Enter the Factory Menu, enable FAC HOTKEY.
2) Check Project ID and the version of software, release date displayed at the bottom of Factory Menu.
3) Enter Design Menu, choose SERVICE MENU
èProject ID, choose corresponding Project ID number of the product (Refer to the “V6-PROJECT -ID0**”in the BOM list).
4) Return to Factory Menu, check the Product model.
5) Choose Factory Menu->NVM RESET and press the right button of the remote and wait until prompt OK appears.
6) Restart the set
7) According to the requirement of the order, Set the items of SHOP INIT and Hotel Menu etc.

8) After aging under normal temperature, calibrate ADC and adjust white balance.

9) Choose Factory Menu ->SHOP and press the button of remote to initialize the set.
Note: After step 9, Hotel Menu will be disabled by default. Therefore, if the order requires hotel function, it is necessary to enable hotel function by set Design MENU->Service Menu->HOTEL ENABLE to ON.
Equipment
·Color Analyzer CA-210.
·Video Pattern Generator Chroma2329.
·Color TV Pattern Generator PM5418/Fluke5418.
·VGA cable , AV(RCA) cable , HDMI cable etc.


5.3. ADC Function

not Calibration


5.4. White Balance adjustments (Manual)


Before adjustment ,you must make sure the ADC status(only PC and YPbPr)


is

“success”and

Color

Analyzer

has

been

calibrated

.Only

AV1,YPbPr,PC,HDMI1 need to be adjusted. HDMI1 should be the first.
Signal and generator
The pattern of the signal should be used are White (Chroma2329 pattern 113) and Grey (pattern 114).
The format of signal are respectively 720P for HDMI1 (Chroma2329 Timing 69),PAL (Chroma2329 Timing38) for AV1,1024X768@60Hz(Chroma2329 Timing14) for VGA

Steps of adjustment
1).Enter the factory menu-> White Balance, select source HDMI 1 and Normal Temperature.
2).Input grey signal in 720p format.
3).Change R-OFFSET and B-OFFSET to make sure the value of color coordination equal to (X=0.270 +/-0.015;Y=0.290 +/-0.015).
4).Input white signal in 720p format.
5).Change R-GAIN and B-GAIN to make sure the value of color coordination equal to (X=0.270 +/-0.015;Y=0.290 +/-0.015).

6).Repeat step 2—5 until both of the value of color coordination of white and grey equal to (X=0.270 +/-0.015;Y=0.290 +/-0.015).
For COOL and WARM color temperature, just repeat step 2—5.The color coordination we recommend for COOL and WARM color temperature is respectively(X=0.270 +/-0.015;Y=0.270 +/-0.015) and (X=0.300 +/-0.015;Y=0.305 +/-0.015).
After the adjustment of HDMI1, you can switch to other source AV, PC and YPbPr and repeat step 1—6 to do the WB adjustment.
Note: For some small size LED panel,the color coordination of specifications is not X=0.270/Y=0.290,and we recommend you adopt the values from panel specifications.
 ADC Calibration and White Balance Adjustment (automatic)
The process of adjusting White Balance automatically is out of the range of this file, Please refer to the relevant technical file of HuiZhou factory of TCL.
6.Chip list of software programming before SMT
Following chips must be programmed before SMT by tools

Position

Chip type

Software description

U301

MT29F2G08ABAEA

HDMI HDCP Key, System Software etc.

Software update: Method of SW update:
1.Download the bin file to the root directory of your USB device (Do not change the file name); Then insert the USB device to USB interface of TV set.
MS08GPSeries with its upgrade file corresponding relation as the table below show:

Chassis Name

Sales
area

Upgrade filename

Remark

MS08GP

LA

MS08GP_MAIN.bin

DVB-T2

How to upgrade FLASH SW using USB

Copy the SW BIN image MS08GP_MBOOT.bin” into USB stick root path.
Note: If there’s already other “MS08GP_MBOOT.bin” into USB root, it needs to be deleted or renamed.

Plug USB stick to the TV USB slot.
Press RCU MENU
èOptionèSoftware upgradeèBy USBèConfirm.
Or, turn off the TV press and hold the power key of key board before reconnect AC cord to restart TV for 5-8seconds (Forced Upgrade).
When the "UPGRADING SOFTWARE" picture appears as below, it means TV is uploading SW BIN image. Waiting a few minutes.

When updating is successful, TV should restart automatically.
There are two methods to upgrade SW using USB, the first one like below
In the previous of upgrade SW using USB, should program mboot bin file
MS08GP_MBOOT.binby ISP_Tool or by USB. .
Then switch off TV by removing AC cord.
Copy the SW BIN image
MS08GP_MAIN.bin” for MS08GP into USB stick (pen
drive) root path
Note: If there’s already other The same name into USB root, it needs to be deleted or renamed
Plug USB stick to the TV
Press and hold the power key of key board before reconnect AC cord to restart TV for 5-8seconds.
Once USB stick starts blinking, TV is uploading SW BIN image.
When update is successful, TV should restart automatically.
Remember to perform “Factory menuÆNVM reset“ and then press RCU “OK” key
Switch off TV by removing AC cord
Reconnect AC cord to restart TV and wait few seconds for Eeprom update.

The second method
To use this method, there should be SW in mainboard to ensure TV can display normally.
Copy the SW BIN image
MS08GP_MAIN.binand into USB stick (pen drive) root path
Press RCU MENU
èOptionèSoftware upgradeèBy USèConfirm
TV display warning information, that means it is upgrading, almost 3minutes later, when upgrade successful, TV should restart automatically.

How to change Project ID with Remote Control Unit (RCU)

Process following subsequence IR codes to change project ID:
062598+MENU+xxx (xxx: Project ID, ex: 001)
Restart TV

How to upgrade MAC Address

Upgrading MAC address need to use the tool in factory and through serial command, the specific methods according to the operation of the factory guidance.

Instructions of Updating SW”
1. The following IC should be pre-copied before SMT process

Position

PART TYPE

Part Number

SW

U301
CPP

IC-TSOP48

13-FS29F2-G0B

Mboot, Main Software

2.The MAC Address, HDCP KEY, Device ID must be upgrade by debug port into U301.

Project ID selecting
1)Press the Menu button of remote control, then select Contrast item of Picture submenu; press 1,9,5,0 consecutively, there you go the Design Menu.
2) Select the SERVICE MENU item, press OK and RIGHT button of the remote to enter submenu,
3)Select the PROJECT ID item, press OK or RIGHT button of the remote to enter the submenu;
4)Press the right or left button of the remote to select the ID you want;
5)After ID selection, press MENU button of the remote to exit DESIGN MENU.
6)Finally, do AC power on/off.

Schematic diagrams

Power supply (SMPS) schematic


Power distribution circuit


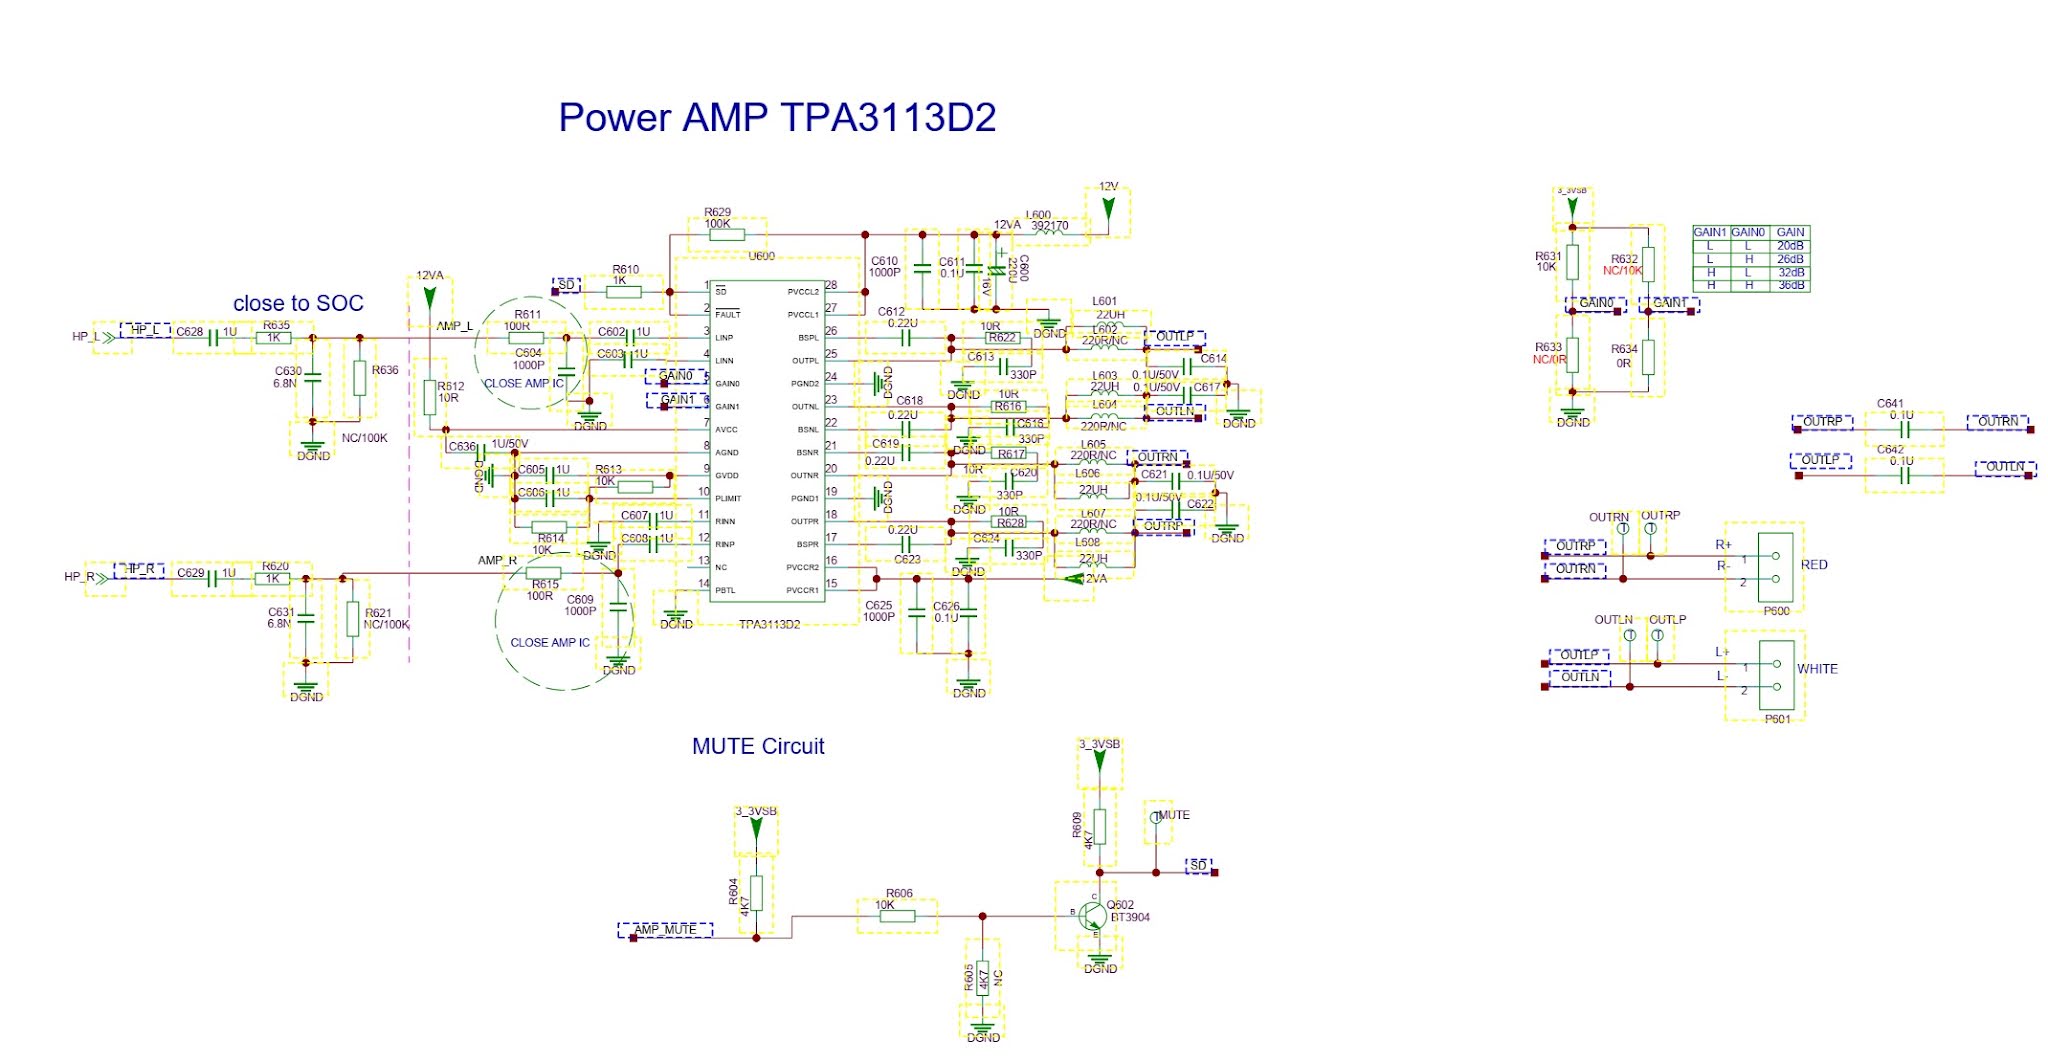
Power amplifier schematic– TPA3113D2


Tuesday, 17 August 2021

Xoceco 27 inch and 32 inch LCD TV – How to enter the service mode, service mode adjustments, SMPS (Power board) schematics software update procedure


Method for entering factory menu: Press MENU → [ -/--] → [9] → [1] → [8] one by one, then enter factory menu, press the SLEEP button to select adjustment page, exit factory menu to press the MENU button.

EEPROM initialization
Enter the first page of factory menu, select “EEPROM INITIALIZE” to be “on”, after turn off the unit, repeating turn on the unit is over.
White balance adjustment
Input PAL signal of 16-level gray-scale (TIMING969 PATTAN921) from VG848 to AV channel, enter user menu, set color to 0, APL to “off”, enter factory menu white balance adjustment page, select color temperature, fixed the GGAIN to 50H, adjust BGIAN and RGAIN to 400nits, then the color coordinate to 284, 299. Fixed the BOFFSET to 50H, adjust GOFFSET and ROFFSET to 5nits, then the color coordinate to 284, 299.
Select cool tint, adjust color coordinate to 270, 283.
Select warm tint, adjust color coordinate to 313, 329.
Performance Inspections
1 TV function
Enter the search menu → auto search, connect RF-TV terminal to the central signal source, check if there is station skipping.
2 AV/S input terminal
Input AV/S signal, check the picture and sound is normal
3 SCART terminal (note: check the SCART terminal, set display mode to AUTO)
3.1 Check SCART INPUT special function
3.1.1 SCART1 terminal function
a. After turn on the unit, connect the SCART1 to PM54200 signal generator, then the unit auto select to SCART1 mode.
b. SCART signal generator sends CVBS signal to the unit, check if the image and sound is normal.
It sends image format (16:9 and 4:3) to the unit, check if the unit auto identify is normal. Change SCART signal to RGB signal, check if the image and sound is normal, It sends image format (16:9 and 4:3) to the unit, check the unit auto identify is normal. Select the PIP mode, connect earphone cable, and check if the sound is normal.
3.1.2 SCART2 terminal function
a. After turn on the unit, connect the SCART2 to PM54200 signal generator, then the unit auto select to SCART2 AV mode.
b. SCART signal generator sends CVBS signal to the unit, check if the image and sound is normal.
It sends image format (16:9 and 4:3) to the unit, check if the unit auto identify is normal, and display the SCART2 AV. Change SCART signal to Y/C signal, select the SCART2 Y/C channel mode, check if the image and sound is normal, It sends image format (16:9 and 4:3) to the unit, check if the unit auto identify is normal. Select the PIP mode, connect earphone cable, and check if the sound is normal.
3.2 Check SCART OUTPUT special function
3.2.1 SCART1 terminal function
Input signal in the TV states, connect the SCART1 terminal to the TV. Change the TV program, check if output signal of SCART1 is TV signal, and the image and sound is normal, change the unit
channel, the CART1 output TV signal, it can not other signal.
3.2.2 SCART2 terminal function.

Input signal in the TV/AV/S states, connect the SCART2 terminal to the TV. Change the unit channel, check if output signal of SCART2 is current signal, and the image and sound is normal.
6.4 YPbPr/YPbPr terminal
Input the YUV signal (VG-848 signal generator), separate input YUV format signal of table 1, check if the image and sound is normal. If the image is deflection of the H-field, select auto sync correction of the SCREEN menu. If the image is slight disturb, adjust the FINE TUNE correction of the SCREEN menu. Open the PIP mode, connect the earphone, and check if the image and sound is normal.

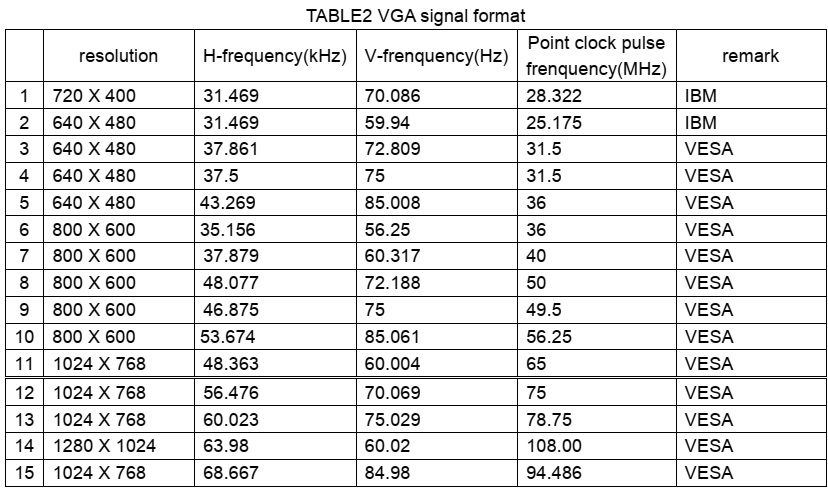
VGA terminal
Input the VGA signal (VG-848 signal generator), separate input VGA format signal of table 1, check if the image and sound is normal. If the image is deflection of the H-field, select auto sync correction of the SCREEN menu. If the image is slight disturb, adjust the FINE TUNE correction of the SCREEN menu. Open the PIP mode, connect the earphone, and check if the image and sound is normal.
6.6 HDMI terminal
HDMI signal format receive the three high definition signal: 480P, 576P, 720P/50/60 Hz, 1080I/50/60 Hz, except for the table 2 signal. Check if the image (contain HDCP ON and OFF) and sound is normal. If the image is deflection of the H-field, select auto sync correction of the SCREEN menu.
Open the PIP mode, connect the earphone, and check if the image and sound is normal.


8.1 select TV channel

8.2 video menu, Mode: Standard, NR: Medium, APL:ON
8.3 sound menu, Volume: 20, Balance: 00, Equalizer: Custom, HP Volume: 20;
8.4 edit menu, Color System: Auto, Sound System: DK;
8.5 option menu, Default Zoom: Auto, Child Lock: Off, Menu Language: English, Country: UK,
WSS: OFF, Blue Screen: On.
Note: the 6.8.4 and 6.8.5 items should set according to clients require.

Method of software upgrading
1. Enter the software upgrading state of the TV
Method 1: press the VOL- button in the unit, turn on the main power switch, then the screen display black screen, but the indicator to blue.
Method 2: Enter factory menu, select the IIC-BUS OFF item.
2. Connection upgrading tools with upgrading port.
3. Dual- click IAPWriter logo, enter the upgrading states (if the PC and the IIC communication trouble, it can prompt.

4. Select the file menu load the software follow as:

5. Select WRITE DEVICE item of the device menu, till the right screen display “DONE”

Turn off the power , restart the unit.
Note: because of the software, it may be no-stabilization, the software can auto download and write.

NOTE: Do not shut the power off or turn the TV set on during the FLASH write. Otherwise it may lead to no way for flash to rewrite.

Working principle analysis of the unit
1. Analog signal flow
Antenna reception signal send to integrative tuner (contain HF and IF amplifier circuit), the tuner is controlled the command (SDA and SCL) of the MCU N301 (M16C), select appropriate channel to system switch, via HF amplifier and IF amplifier decode, output video signal of 2VPP and sound signal of 1VPP.
Sound signal (SCART1, 2 sound, AV sound, YPbPr, HDMI and D-SUB) via N581 HEF4052BT (sound diverter switch) to output signal, it send to N801(MPS3410 sound processing and volume control) switch of audio. Select right/left sound channel, their send to digital sound amplifier N803 (TPA3008) amplify, then send to speaker.
After output video signal of tuner, SCART1 video signal and RGB signal via matched resistance, the signal thought alone channel send to main decode IC(N101 SVP-EX52) video switch, A/D transition, digital decode, image scale and OSD superposition, then send to LVDS level drive for LCD screen.
AV, S-Video, SCART2 video and Y/C signal thought matched resistance, the signal send to the N506 video switch (SN74CBT3257CDR), via switching to selected signal (EX52_Y and EX52_C) to main decode IC (N101 SVP-EX52) video switch, A/D transition, digital decode, image scale and OSD superposition, then send to LVDS level drive for LCD screen.
D-sub and YPbPr signal thought matched resistance, the signal send to the N507 video switch (SN74CBT3257CDR), via switching to selected signal (EX52_YUV) to main decode IC (N101 SVP-EX52) video switch, A/D transition, digital decode, image scale and OSD superposition, then send to LVDS level drive for LCD screen.
2. Digital signal flow:
HDMI signal thought HDMI reception chip N405 (SiI9011HDMI with HDCP function), after receive, output digital format signal send to SVP-EX52 PIP channel thought image scale and OSD superposition, then send to LVDS level drive for LCD screen. The HDMI chip output audio digital format signal change to analog sound signal from N403 (CS4344 audio DA transfer chip), then N581 switched to N801 (MPS3410 sound processing and volume control).
3. TELETEXT function
This unit adopt main decode IC N101(SVP-EX52) of Trident company, it has TELETEXT decode function, after decoded, the teletext information in OSD display.

Sound processing IC (MSP3410)
Sound signal send to sound processing N801 MSP3410, and dual-circuit tuner has second SIF, it sends to N801 (stereo decode and auto volume control), N801 has audio channel switch, after switching in N581 (HEF4052BT), the audio input of GA/HDMI/YPbPr will be sent to N801 together with the audio signal of TV and AV to do the switching process. A way signal thought volume and high-low sound controlled, output the left and right audio send to digital audio amplifier N803 (TPA3008) amplify, then it send to speaker, other way signal output left-right audio send to earphone amplifier N805 (NJW1109), after audio control and power amplifier, it output to earphone socket. Other two ways signal output audio of TV out and AV out by SCART terminal of video board.

Xoceco 27 inch and 32 inch power board [SMPS] schematic diagram

L27W6 SMPS schematic

L32W5 SMPS schematic


LG 52LG50FD, 52LG50FD-SA-Service adjustments-service mode entry-white balance adjustment-ADC component 1 RGB adjustment and more

  These adjustments are similar to 42LB7DF Because this is not a hot chassis, it is not necessary to use an isolation transformer. However...